- Video with alpha transparency on the web1
- Overlaying Video With Transparency While Wrangling Cross-Browser Support | CSS-Tricks2
- How to use transparent videos on the web in 2021 - Rotato3
- Alpha Masking with FFMPEG | Curio Museum4
- m90/seeThru5
Footnotes
-
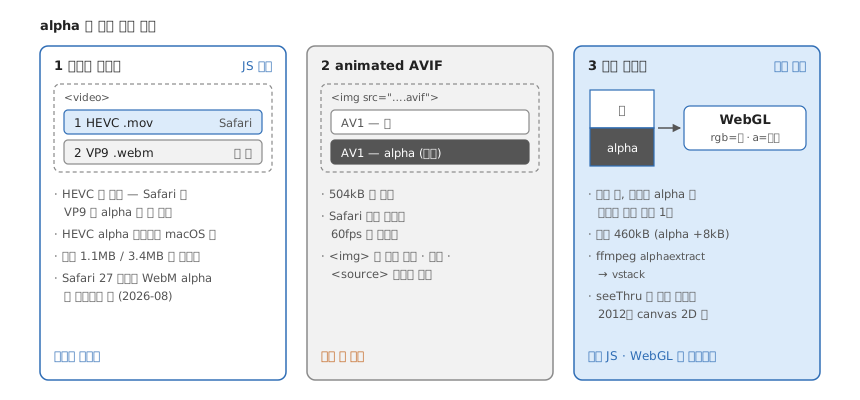
세 방식을 비교한다 — 네이티브(VP9 + HEVC)는 무겁고 버그가 있고, animated AVIF 는 Safari·성능에서 막힌다. 그래서 색과 alpha 를 위아래로 쌓은 AV1 영상 하나를 WebGL 로 합치는
<stacked-alpha-video>를 만들었다. 인코딩 ffmpeg 명령 포함. ↩ -
2020년 기준 탐색기. GIF·APNG·PNG 루프를 거쳐 WebM alpha(GIF 5.8MB → 540KB)로 갔다가 Safari 에서 검은 배경을 보고, Safari 엔 HEVC alpha 를 주는 혼합안에 도착한다. HEVC 는 Mac 의 Finder·Compressor 로 만들고, Safari 버전은 UA 로 판별해
src를 JS 로 넣는다. ↩ -
네이티브 방식(WebM + HEVC) 실무 가이드 — 무엇을 내보내고 어떻게 변환해
<video>에 넣는지. 2026-08 갱신으로 Safari 27 베타에 WebM alpha 가 들어온다는 소식이 추가됐다. ↩ -
alpha 를 만드는 쪽. 코덱별 alpha 지원(중간 코덱 ProRes 4444, 배포 코덱 VP9)과 ffmpeg 로 VP9·ProRes alpha 인코딩, 표현식으로 도형을 그려 alpha 마스크를 씌우는 법. ↩
-
2012년 라이브러리. alpha 를 영상 안에 따로 담아 두고 canvas 에 다시 그려 투명을 입힌다 — Jake 글의 스택 방식의 canvas 2D 판. README 가 스스로 “WebM·HEVC 네이티브가 되니 아마 필요 없다”고 적는다. ↩
- 프런트엔드(클라이언트)에서 MP4 파일의 오디오 존재 여부를 확인하기
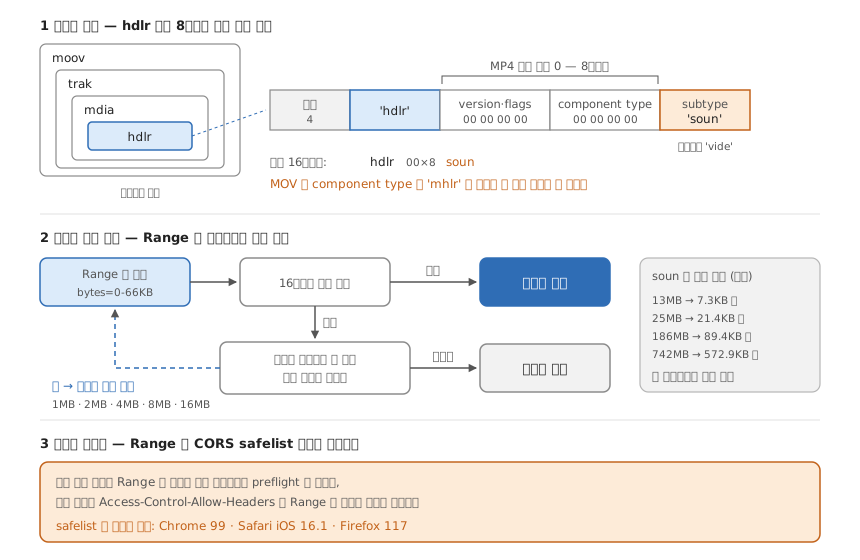
- 브라우저 API 사용 시 호환성 문제 발생 (Chrome, Safari, Firefox 각각 다른 API 사용)
- FileReader API를 사용하여 서버에서 응답받은 바이너리 데이터를 읽고, 이를 분석해 오디오 여부 확인.
- 오디오 정보가 발견되지 않으면 추가 데이터 요청하여 확인 범위를 증가시켜 반복.
await ffmpeg.writeFile('input.mp4', await fetchFile(file))
await ffmpeg.ffprobe(['-i', 'input.mp4', '-show_streams', '-o', 'output.txt'])

const data = await ffmpeg.readFile('output.txt')
…하지만 ffmpeg의 중요성을 깨달았다.
A complete, cross-platform solution to record, convert and stream audio and video.
# $1 = frames로 사용될 파일들
extractFrames() {
  ffmpeg -i $1 -vf fps=30 output_frame_%d.png
}

# $1 = frames로 사용될 파일들
# $2 = output 파일
# Example: concatFrames ./frame_%5d.png output.webm
concatFrames() {
  ffmpeg -framerate 30 -i $1 -c:v libvpx-vp9 -pix_fmt yuva420p $2
}

# $1 = frame로 사용될 파일
# $2 = output 파일
# Example: frameToVideo frame.jpg output.mp4
frameToVideo() {
  ffmpeg -loop 1 -i $1 -c:v libx264 -t 10 -pix_fmt yuv420p $2
}

# $1 = 인코딩할 영상 video.mp4
# $2 = output 파일명
encodingVideo() {
  ffmpeg -an -i $1 -vcodec libx264 -pix_fmt yuv420p -profile:v baseline -level 3 "${$2}.mp4"
  ffmpeg -i "${$2}.mp4" -vcodec libvpx-vp9 -b:v 1M -acodec libvorbis "${$2}.webm"
}

# $1 = 자를 영상, $2 = 시작, $3 = 끝, $4 = output 파일
# Example: cutVideo input.mp4 00:00:00 00:01:00 output.mp4
cutVideo() {
  ffmpeg -i $1 -ss $2 -to $3 -c:v copy -c:a copy $4
}