npm 레지스트리에서 특정 패키지에 대한 메타데이터 및 기타 정보를 볼 수 있습니다. 이 명령으로 패키지의 최신 버전, 패키지의 종속성, 작성자 및 라이선스 정보, 기타 세부 정보를 확인할 수 있습니다.
# 이전 버전 리스트를 확인하고 싶을때
npm view cowsay versions

# 각 버전이 게시된 시간을 확인
npm view cowsay timeFootnotes
-
설치된 npm 패키지의 버전을 확인하는 방법에 대한 가이드 ↩
// 현재 실행된 stage 값을 참조하기
// 하지만 스크립트를 따로 작성하는게 더 효율적으로 보인다.

{
  "scripts": {
    "dev:hello": "echo ${npm_lifecycle_event#dev:}"
  }
}- yarnpkg - Is there a way to get the name of the npm script passed to the command specified by that script? - Stack Overflow1
- scripts | npm Docs2
Footnotes
-
npm 스크립트의 이름을 얻는 방법에 대한 질문과
npm_lifecycle_event환경 변수를 사용하는 방법으로 제안 ↩ -
package.json 파일에서 스크립트를 사용하는 방법에 대한 개요, 기본 제공 환경 변수 목록도 포함 — “the
npm_lifecycle_eventenvironment variable is set to whichever stage of the cycle is being executed.” 스크립트는sh로 돌아서 bash 전용${var//a/b}대신 POSIX${var#prefix}를 쓴다 — “Scripts are run by passing the line as a script argument tosh.” ↩
CRA 는 .env 의 ${VAR} 를 이미 있는 환경 변수로 채운다(dotenv-expand)1 — turbo 가 태스크마다 넣어주는 TURBO_HASH2 를 그대로 받아 쓴다.
# .env
REACT_APP_VERSION=0.0.0-${TURBO_HASH}
REACT_APP_VERSION을 자동으로 입력할 방법을 찾다가 결국 hash값을 추가했다.
- Adding Custom Environment Variables | Create React App
- GitHub - motdotla/dotenv-expand: Variable expansion for dotenv. Expand variables already on your machine for use in your .env file.
- Create timestamp variable in bash script - Stack Overflow
Footnotes
-
Adding Custom Environment Variables | Create React App: “Expand variables already on your machine for use in your
.envfile (using dotenv-expand).” ↩ -
System environment variables | Turborepo: “Turborepo will make the following environment variables available within your tasks while they are executing” —
TURBO_HASH: “The hash of the currently running task.” ↩
리눅스는 사용자당 inotify 감시 개수에 상한(max_user_watches)이 있다1 — 모자라면 webpack 이 변경을 못 알아챈다2.
# `System limit for number of file watchers reached`

echo fs.inotify.max_user_watches=524288 | sudo tee -a /etc/sysctl.conf && sudo sysctl -pFootnotes
-
inotify(7) - Linux manual page: “/proc/sys/fs/inotify/max_user_watches This specifies an upper limit on the number of watches that can be created per real user ID.” ↩
-
Watch and WatchOptions | webpack: “Verify that you have enough available watchers in your system. If this value is too low, the file watcher in Webpack won’t recognize the changes” ↩
date +%s 는 1970-01-01 UTC 이후 초다.1
# 빌드 시 timestamp를 참조하기 위한 방법
timestamp=$(date +%s) # 1670759329
# 하지만 현실에서는 `TURBO_HASH`값을 참조하는 방식을 `.env`에서 사용
REACT_APP_VERSION=1.0.0-${TURBO_HASH}Footnotes
-
Time conversion specifiers (GNU Coreutils): “seconds since the Epoch, i.e., since 1970-01-01 00:00 UTC.” ↩
-
스크립트에서 현재 타임스탬프를 특정 형식의 변수로 만드는 방법에 대한 질문. 특정 형식 문자열과 함께 날짜 명령을 사용하여 타임스탬프를 만들고 변수에 저장하도록 하는 답변들… ↩
-
dotenv-expand는
.env파일에서 환경 변수를 확장하기 위한 모듈입니다. 중첩 변수 확장 및 셸 명령 실행과 같은 더 많은 고급 기능을 사용 가능. ↩
로컬에서만 실행 해야하는 프로젝트가 있길래 아무래도 사전설정 같은 귀찮은 문제가 있으니 pkg를 사용하면 좋을 것 같아서 들어가봤는데 개발이 중단 되었다.
노드 21버젼에서 해당 기능이 지원되는데 재미있는 시도들이 많이 나왔으면 좋겠다.
Excel View1 라이브러리를 보던 중, Excel과 Node의 상호작용에 대한 궁금증이 생겼다. 아무래도 웹개발을 하다보니 어플리케이션과 통신할 수 있는 부분에 대해서 전혀 생각을 안했었다는 걸 깨닫고 이러한 부분을 보완하기 위해 Excel과의 통신 방식을 찾아봄.
우선, 위 라이브러리 코드를 통해 ActiveXObject('Excel.Application')2로 Excel 객체를 생성하고, 이를 통해 Excel의 다양한 기능에 접근할 수 있다는 것을 확인했다. 그리고 node-activex의 문서에서 링크를 통해 추가적인 정보들을 확인할 수 있었는데 아무래도 자주 보던 영역이 아니라 일단 확인만 하는 단계에서 멈춤.
이 접근을 통해, Excel과 상호작용하는 방법에 대해 실마리를 찾을 수 있었음. 그러나 모든 과정이 순조롭지만은 않은게. ActiveXObject를 사용하는 부분에서 개념적 이해가 부족했고, 그밖에 Excel의 객체모델에 대해서도 배경지식이 많이 부족하다는 걸 알게됨.
이번 경험을 통해, 웹 개발자가 어플리케이션 레벨의 개념들도 이해하면 좋겠다는 생각을 하게 됨. 나중에 기회가 되면 살펴보고 일단 view 기능을 스프레드시트로 구현해 봐야겠다.
Footnotes
-
활성 셀의 행 전체를 별도 창에 띄워서 좌우 스크롤 없이 보게 해주는 도구 ↩
-
https://github.com/timepp/excelview/blob/17cda5a7b9915758ac86aa7f8978682b2479acb4/excel.js#L70 ↩
- Node.js Child Processes: Everything you need to know1
- The definitive Node.js handbook
- Tao of Node - Design, Architecture & Best Practices
- Useful Built-in Node.js APIs
glob
- GitHub - isaacs/node-glob
- GitHub - mrmlnc/fast-glob
- GitHub - sindresorhus/globby
- GitHub - SuperchupuDev/tinyglobby
Footnotes
-
spawn(), exec(), execFile(), fork() ↩
이미지 다운로드 구현. 이미지 응답값을 buffer로 변환해서 파일쓰기로 저장한다.
const fs = require('fs')
const path = require('path')
const util = require('util')
const fetch = require('node-fetch')

const writeFile = util.promisify(fs.writeFile)
const mkdir = util.promisify(fs.mkdir)

const FOLDER_PATH = 'FOLDER_PATH'

async function download({ url }) {
  const response = await fetch(url)
  const buffer = Buffer.from(await response.arrayBuffer())

  if (!fs.existsSync(FOLDER_PATH)) {
    await mkdir(FOLDER_PATH)
  }

  await writeFile(path.join(FOLDER_PATH, path.basename(new URL(url).pathname)), buffer)
}Node 에서 재귀 크롤을 이벤트 루프에 맡기기
종료 감지를 큐의 onIdle() 에1, 중복 제거의 원자성을 단일 스레드에2 맡기면 in-flight 카운터와 락이 사라진다.
Node 로 링크를 따라가며 페이지를 재귀 크롤할 때 꺼낸다. 처리 결과(새 링크)가 다시 입력으로 돌아가서 일이 언제 바닥날지 미리 모르는 경우다.
import PQueue from 'p-queue'

const queue = new PQueue({ concurrency: 10 }) // 동시 요청 수만 제한한다. add 는 막히지 않는다(무제한 대기열)
const seen = new Set()

function enqueue(url) {
  if (seen.has(url)) return
  seen.add(url) // has 와 add 사이에 await 가 없으니 다른 코드가 끼어들 수 없다 — 락이 필요 없다
  queue.add(() => visit(url)) // 요청보다 먼저 표시한다. 요청 뒤에 표시하면 그 사이 같은 URL 이 또 들어온다
}

async function visit(url) {
  const res = await fetch(url) // HEAD 가 아니라 GET — 링크를 더 찾으려면 본문이 있어야 한다
  const html = await res.text()
  for (const link of extractLinks(html, url)) enqueue(link) // 이 태스크가 끝나기 전에 자식을 넣는다
}

enqueue(startUrl)
await queue.onIdle() // 대기열이 비고 실행 중인 태스크도 0 일 때 resolve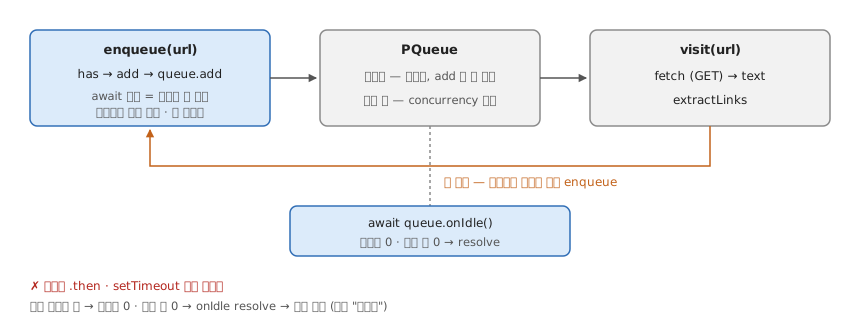
extractLinks 는 HTML 에서 같은 사이트 링크를 뽑는 함수(자리표시자). 서로 가리키는 페이지가 있어도 onIdle() 이 resolve 되고 seen.size 가 고유 URL 수와 같으면 된 것이다.
- 출처: How Other Link Checkers Do Recursion — linkinator(
onIdle·GET)·broken-link-checker 분석
Footnotes
-
p-queue README: “Returns a promise that resolves when the queue is empty and all tasks have completed” —
queue.size === 0 && queue.pending === 0. ↩ -
JavaScript execution model — MDN: “whenever a function runs, it cannot be preempted and will run entirely before any other code runs” ↩
import sharp from 'sharp'
import fg from 'fast-glob'

const entries = await fg('./**/*.png')

for (const entry of entries) {
  const trimmedBuffer = await sharp(entry).trim().toBuffer()
  const trimmedImage = sharp(trimmedBuffer)
  const trimmedMetadata = await trimmedImage.metadata()

  await trimmedImage
    .resize({
      width: Math.round(trimmedMetadata.width / 2),
      height: Math.round(trimmedMetadata.height / 2),
    })
    .png()
    .toFile(entry.replace(/\.png$/, '.half.png'))
}
offset(top, left)값, 이미지 사이즈 설정으로 crop 구현이 가능하다
sharp('img.png')
  .extract({
    left: 50,
    top: 50,
    width: 200,
    height: 400
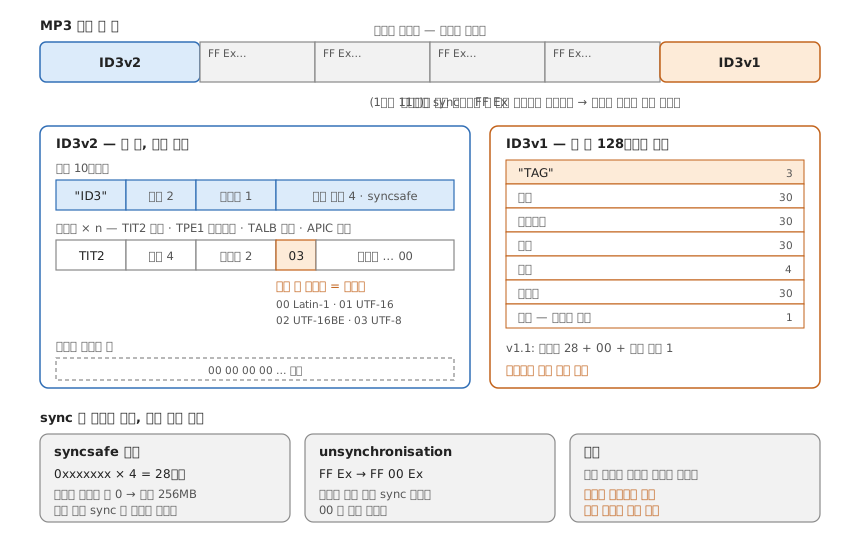
})ID3 is a metadata container most often used in conjunction with the MP3 audio file format.
Footnotes
- yarn upgrade-interactive | Yarn1
- Find newer versions of package dependencies than what your package.json allows2
Footnotes
-
이 명령은 업그레이드를 수행하기 전에 오래된 패키지를 표시하여 사용자가 업그레이드할 패키지를 선택할 수 있도록 합니다. ↩
-
npm-check-updates는 지정된 버전을 무시하고 package.json 종속성을 최신 버전으로 업그레이드합니다 . ↩
CSV와는 다르다! CSV와는!
header: 1 이면 행이 객체가 아니라 배열로 나와 열을 인덱스로 자른다 — 빈 행도 [] 로 남아서 filter 로 걷어낸다.1
const fs = require('fs')
const XLSX = require('xlsx')

const buf = fs.readFileSync('developer_labels_20181221.xlsx')
const workbook = XLSX.read(buf, { type: 'buffer' })

const roa = XLSX.utils.sheet_to_json(workbook.Sheets[workbook.SheetNames[0]], {
  header: 1,
})

const result = roa
  .slice(1)
  .map((item) => item.slice(1, 4))
  .filter((item) => item.some(Boolean))
  .reduce(
    (p, n) => {
      const [key, en, ko] = n
      const newKey = key.toLowerCase().replace(/\-/g, '_')

      p['en'][newKey] = en
      p['ko'][newKey] = ko

      return p
    },
    { en: {}, ko: {} }
  )

fs.writeFileSync('en.json', JSON.stringify(result.en), 'utf8')
fs.writeFileSync('ko.json', JSON.stringify(result.ko), 'utf8')Footnotes
-
Array Output | SheetJS:
header: 1— “Generate an array of arrays” / “Whenheaderis1, the default is to generate blank rows.” ↩
file: 로 파일 시스템의 패키지 디렉터리를 의존성으로 건다 — npm install --save ../foo/bar 로 설치하면 상대 경로로 이렇게 저장된다.1
{
  "dependencies": {
    "bar": "file:../foo/bar"
  }
}Footnotes
-
package.json | npm Docs: “As of version 2.0.0 you can provide a path to a local directory that contains a package.” / “in which case they will be normalized to a relative path and added to your
package.json.” ↩
# 특정 패키지에 모듈을 설치해야한다면
yarn workspace <workspace_name> <command>
<command> 자리에 아무 Yarn 명령이나 오고 그 워크스페이스 안에서 돈다 — add 면 그 패키지의 package.json 에 들어간다.1
Footnotes
-
yarn workspace | Yarn: “This will run the chosen Yarn command in the selected workspace.” /
yarn workspace awesome-package add react react-dom --dev— “will addreactandreact-domasdevDependenciesin yourpackages/awesome-package/package.json.” ↩